ListView is a cool control in ASP.NET. It is usefull for - well - listing data.
Even cooler you can nest a ListView inside another ListView if you need to group your list into groups - e.g. log grouped by date or an OrderHeader -> OrderLines grouping - and it is easy.
Unfortunately editing nested items is a bit clumcy - and it took me some time to figure it out. I have made an example here with two nested ListViews.
<%@ Page Language="C#" AutoEventWireup="true" CodeBehind="WebForm1.aspx.cs" Inherits="NesterListTest.WebForm1" EnableEventValidation="false" %>
<!DOCTYPE html PUBLIC "-//W3C//DTD XHTML 1.0 Transitional//EN" "http://www.w3.org/TR/xhtml1/DTD/xhtml1-transitional.dtd">
<html xmlns="http://www.w3.org/1999/xhtml">
<head id="Head1" runat="server">
<title></title>
</head>
<body>
<form id="form1" runat="server">
<div>
<asp:ListView ID="ListView1" runat="server" DataKeyNames="Id" OnItemDataBound="BindNestedList">
<LayoutTemplate>
<table id="RegistrationLines">
<tr id="itemPlaceholder" runat="server"></tr>
</table>
</LayoutTemplate>
<ItemTemplate>
<tr><th>OuterIndex: <%# Eval("Id") %></th></tr>
<asp:ListView ID="ListView2" runat="server" DataKeyNames="Id" OnItemEditing="EditNestedItem">
<ItemTemplate>
<tr>
<td><%# Eval("Value") %></td>
<td><asp:Button runat="server" ID="EditButton" CommandName="edit" Text="Edit" /></td>
</tr>
</ItemTemplate>
<EditItemTemplate>
<tr>
<td>Now editing -></td>
<td><%# Eval("Value") %></td>
</tr>
</EditItemTemplate>
</asp:ListView>
</ItemTemplate>
</asp:ListView>
</div>
</form>
</body>
</html>
In the Page_Load I just create some funke sample data. Note that I have two classes. These are just for holding the data - nothing else.
using System;
using System.Collections.Generic;
using System.Linq;
using System.Web;
using System.Web.UI;
using System.Web.UI.WebControls;
namespace NesterListTest
{
public partial class WebForm1 : System.Web.UI.Page
{
List<TestContainer> list;
protected void Page_Load(object sender, EventArgs e)
{
list = new List<TestContainer>();
for (int i = 0; i < 5; i++)
{
TestContainer tc = new TestContainer() { Id = i };
List<TestItem> l = new List<TestItem>();
for (int j = 0; j < i % 3; j++)
{
TestItem t = new TestItem() { Id = j, Value = "Cheese " + i + " > " + j };
l.Add(t);
}
tc.Items = l.ToArray();
list.Add(tc);
}
ListView1.DataSource = list;
ListView1.DataBind();
}
protected void BindNestedList(Object sender, ListViewItemEventArgs e)
{
if (e.Item.ItemType == ListViewItemType.DataItem)
{
ListViewDataItem item = (ListViewDataItem)e.Item;
TestContainer container = (TestContainer)item.DataItem;
ListView innerList = (ListView)item.FindControl("ListView2");
innerList.DataSource = container.Items;
innerList.DataBind();
}
}
protected void EditNestedItem(Object sender, ListViewEditEventArgs e)
{
ListView lvs = sender as ListView;
ListViewDataItem ctl = (ListViewDataItem)ListView1.FindControl(lvs.Parent.ID);
if (ctl != null)
{
ListView lv = (ListView)ctl.FindControl("ListView2");
lv.EditIndex = e.NewEditIndex;
int indexOfParentControl = ListView1.Items.IndexOf(ctl);
TestContainer t = list[indexOfParentControl];
lv.DataSource = t.Items;
lv.DataBind();
}
}
}
public class TestContainer
{
public int Id { get; set; }
public TestItem[] Items { get; set; }
}
public class TestItem
{
public int Id { get; set; }
public string Value { get; set; }
}
}
In the EditNestedItem method, I find the parent control of the sender. As the sender is the inner ListView, the parent of this is a ListViewDataItem of the outer ListView. In the ListViewDataItem I find the inner ListView and set the EditIndex of it.
I then find the index of the ListViewDataItem in the outer ListViews items collection and now I have the index of the TestContainer for ListViewDataItem. Then I can grap it from the list and bind the Items of the TestContainer to the inner ListView.
Showing posts with label Visual Studio 2010. Show all posts
Showing posts with label Visual Studio 2010. Show all posts
Wednesday, 20 April 2011
Saturday, 20 November 2010
Develop SharePoint 2007 webparts using WSPBuilder 2010 Beta in Visual Studio 2010
WSPBuilder is a great tool when developing Webparts for SharePoint - developed by Carsten Keutmann. The tool has been released in a Visual Studio 2010 edition which are compatible with both SharePoint 2007 and SharePoint 2010.


At the moment I work on a project for a customer in SharePoint 2007, but develop my WebParts in Visual Studio 2010. This gave some headaches, so this post is a short How-To onDeveloping SharePoint 2007 webparts using WSPBuilder in Visual Studio 2010.
Install WSPBuilder
Go to WSPBuilder downloads page and grab the latest version of WSPBuilder Extensions 2010. Close Visual Studio and run the MSI file (the installer files contains installation options for all supported configurations)
Create a WSPBuilder project
Open Visual Studio 2010 and click File -> New... -> Project... and choose the WSPBuilder group below Visual C# in Installed Templates. In the left side choose WSPBuilder Project. In the bottom part of the dialog give the solution a name and a location.
The created solution has this structure.
Building a WSP package
To build a WSP package of the project right-click the project and choose WSPBuilder -> Build WSP.
The Output window will show something like
Since there is no webpart file in the project yet, no dll file is created during build.
The important thing in the output is the line Solution Compability: SharePoint 2010. The WSPBuilder extensions actually checks the webpart content and decide if the webpart is compatible with SharePoint 2007 and SharePoint 2010 - or SharePoint 2010 only.
Make the project SharePoint 2007 compatible
First we need to set the Target Framework to .Net 3.5. This actually has nothing to do with the compability - but to ensure the webpart dll stays managed.
Right-click the project and choose Properties. Under the Application pane set Target Framework to .NET Framework 3.5. Save the file. Notice that a web.config file is created in the project. This file has no influence on the project, so just ignore it (but do not delete it).
Next thing to do is delete the Manifest.Config file. This is a new concept in SharePoint 2010 and not supported in SharePoint 2007.
The solution is now SharePoint 2007 compatible and the output of Build WSP is Solution Compability: SharePoint 2007 and SharePoint 2010.
Adding a feature to the project
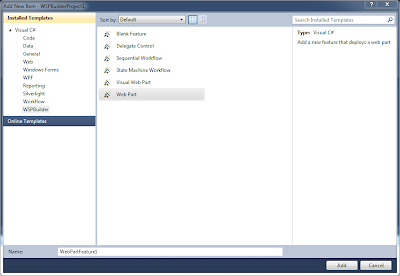
To add a feature (that is a webpart) to the project right-click the project and choose Add -> New Item.... In the dialog choose the WSPBuilder group below Visual C# in the left pane and Web Part in the right pane. In the bottom part give the webpart a name.
In the next dialog give the feature a Title and a Description. Then choose the Scope the webpart should be deployed to (I usually choose Web) and uncheck Event handler. Click Next.
In the next dialog give the web part a Title and a Description. Then uncheck Removal Code and click Finish.
A new feature is now added to the project and the structure of the project now looks like this.
The pitfall
If building the WSP package the output now shows the package is only SharePoint 2010 compatible. The newly added files elements.xml, feature.xml, the .webpart and the .cs file all seems to be SharePoint 2007 compatible - so what made the project incompatible. It took me a while to figure this out.
Right-click the project and choose Open Folder in Windows Explorer.
The Manifest.Config file is back. The Add feature wizard created the file and though it is not added to the Visual Studio project. WSP Builder finds it and uses it while building the WSP package. Delete file and build the WSP package again - and now the WSP package is both SharePoint 2007 and SharePoint 2010 compatible again.
That's it folks...
Subscribe to:
Posts (Atom)